코드 가독성
내가 쓴 코드를 다른 사람이 쉽게 이해하고 유지보수할 수 있게 만드는 것.
9장에서는 아래의 방법으로 기존의 코드를 리팩터링하고 있다.
- 익명클래스 -> 람다표현식
- 람다표현식 -> 메서드 참조
- 명령형 데이터 처리 -> 스트림
익명클래스를 람다 표현식으로 리팩터링하기
Runnable runnable = new Runnable() {
    @Override
    public void run() {
        System.out.println("Hello");
    }
};

Runnable runnable2 = () -> System.out.println("Hello");
익명 클래스를 람다로 바꿀 때 주의할 점이 세가지 있다.
1. this라는 키워드가 쓰이고 있다면, 익명 클래스 내에서의 this는 익명 클래스 내에서의 scope를 가리키고, 람다에서의 this는 wrapping class를 가리키기 때문에 문법이 다르게 작용한다.
private String str = "Hello";

private void testScope() {
    Runnable run1 = new Runnable() {
        String str = "World";
        @Override
        public void run() {
            System.out.println(this.str); // World
        }
    };
    run1.run();

    Runnable run2 = () -> System.out.println(this.str); // Hello
    run2.run();
}
2. 익명 클래스는 감싸고 있는 클래스의 변수를 가릴 수도 있다. 람다는 불가하다. 각자의 scope가 다르기 때문에 생기는 문제로 보인다.
int a = 10;
Runnable r1 = () -> {
    // int a = 2; // compile error
    System.out.println(a); // prints 10
};
r1.run();

Runnable r2 = new Runnable() {
    @Override
    public void run() {
        int a = 2; // shadow variable 섀도 변수
        System.out.println(a); // prints 2
    }
};
r2.run();
3. Context Overloading의 모호함

같은 시그니처를 갖는 함수가 람다로 변환되었을 때, 어떤 것을 기준으로 해야할지 모르기 때문에 문제가 생길 수 있다. IntelliJ에서는 이걸 사전에 Ambiguous method call이라는 메시지와 함께 알려준다.
doSomething((Task) () -> System.out.println("did something"));
doSomething((Runnable) () -> System.out.println("did something"));
이렇게 명시적 형변환을 하게 되면 모호함을 제거할 수 있다.
람다 표현식을 메서드 참조로 리팩터링하기
Map<CaloricLevel, List<Dish>> dishesByCaloricLevel = menu.stream().collect(Collectors.groupingBy(
        dish -> {
            if (dish.getCalories() <= 400) return CaloricLevel.DIET;
            else if(dish.getCalories() <= 700) return CaloricLevel.NORMAL;
            else return CaloricLevel.FAT;
        }
));
6장에서 나왔던 칼로리 수준으로 요리를 그룹화하는 코드인데, 사실 dish 기준으로 필터링이 되는 것이기 때문에 Dish 모델에서 메서드로 추출하는 것이 좋다.
public class Dish {
....

    public CaloricLevel getCaloricLevel() {
    	if (this.getCalories() <= 400) return CaloricLevel.DIET;
        else if(this.getCalories() <= 700) return CaloricLevel.NORMAL;
        else return CaloricLevel.FAT;
    }

}


Map<CaloricLevel, List<Dish>> dishesByCaloricLevel =
	menu.stream().collect(groupingBy(Dish::getCaloricLevel));
sorting에 대한 구현도 해당 모델의 method로 빼서 좀 더 간결하게 만들 수 있다.
inventory.sort(
	(Apple a1, Apple a2) -> a1.getWeight().compareTo(a2.getWeight()));

inventory.sort(comparing(Apple::getWeight());
명령형 데이터 처리를 스트림으로 리팩터링하기
스트림 API는 데이터 처리 파이프라인의 의도를 더 명확하게 보여준다. 게다가 쇼트서킷과 게으름이라는 최적화와 멀티코어 아키텍처를 활용할 수 있다.
List<String> dishNames = new ArrayList<>();
for (Dish dish: menu) {
    if (dish.getCalories() > 300) {
        dishNames.add(dish.getName());
    }
}

menu.parallelStream()
        .filter(dish -> dish.getCalories() > 300)
        .map(Dish::getName)
        .collect(Collectors.toList());
(사실 이 예제에서 의도 파악을 위한 stream 변환의 필요성은 크게 와닿지 않는다. parallel을 쓸 수 있는 것은 장점이지만..)
코드 유연성 개선
람다 표현식을 이용해서 리팩터링 하는 방법 중에 조건부 연기 실행conditional deferred execution과 실행 어라운드execute around 라는 패턴을 소개하고 있다.
조건부 연기 실행
if (logger.isLoggable(Log.FINER)) {
	logger.finer("Problem: " generateDiagnostic());
}
log level에 따라 로깅을 달리 적용하고자 하는 코드인데, if 절이 실행시마다 덕지 덕지 붙는 문제가 있다. logger 객체 상태를 클라이언트에서 알고 있는 문제도 있다.
public void log(Level level, Supplier<String> msgSupplier)

logger.log(Level.FINER, () -> "Problem: " + generateDiagnostic()); // method 호출
이렇게 시그니처를 바꾸게 되면
public void log(Level level, Supplier<String> msgSupplier) {
    if (logger.isLoggable(level)) { // false이면 생성이 되지 않음
        log(level, msgSupplier.get()); // 람다 실행
    }
}
logger의 상태가 클라이언트의 관심사에서 벗어나게 되고, 내부적으로 객체의 상태를 확인하게 된다.
코드의 가독성이 좋아지고, if 구문에서 true일 때 메시지 생성되도록 생성 과정이 연기된다.
실행 어라운드
메소드 실행 전이나 후에 매번 같은 동작을 반복적으로 수행한다면 이를 람다로 변환해서 코드 중복을 줄일 수 있다.
public interface BufferedReaderProcessor {
	String process(BufferedReader b) throws IOException;
}


public String processFile(BufferedReaderProcessor p) throws IOException {
    ClassLoader classLoader = getClass().getClassLoader();
    File file = new File(classLoader.getResource("data.txt").getFile());
    try (BufferedReader br = new BufferedReader(new FileReader(file))) {
        return p.process(br); // 인수로 전달된 BufferedReaderProcessor 를 실행
    }
}

// 실행
String oneLine = processFile((BufferedReader b) -> b.readLine());
String twoLines = processFile((BufferedReader b) -> b.readLine() + b.readLine());
람다로 객체지향 디자인 패턴 리팩터링하기
람다 표현식이 더해지면서 자바에 여러가지 디자인 패턴을 적용해서 코드를 작성하는 것이 좀 더 수월해졌다.
9장에서는 다음 디자인 패턴의 적용 예제를 다루고 있다.
- 전략 패턴
- 템플릿 메서드 패턴
- 옵저버 패턴
- 의무 체인 패턴
- 팩토리 패턴
전략 패턴
전략 패턴은 한 유형의 알고리즘을 보유한 상태에서 런타임에 적절한 알고리즘을 선택하는 기법이다.
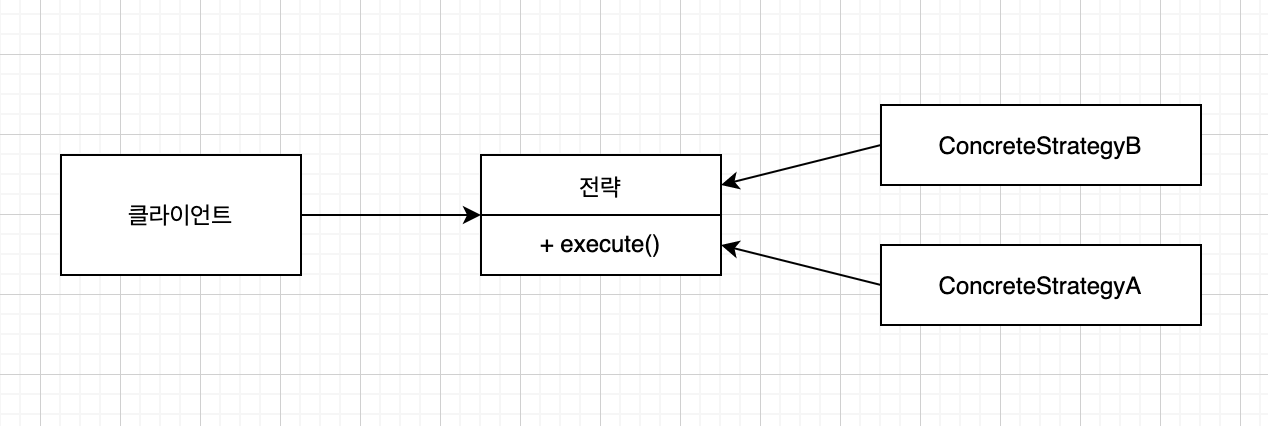
Strategy 인터페이스를 구현한 ConcreteStrategyA와 ConcreteStrategyB를 이용해서 호출하는 쪽에서 전략을 취할 수 있도록 한다.
public interface ValidationStrategy {
    boolean execute(String s);
}
위와 같은 전략을 인터페이스로 선언하고 구현체를 정의한다.
public class IsAllLowerCase implements ValidationStrategy {
    @Override
    public boolean execute(String s) {
        return s.matches("[a-z]+");
    }
}

public class IsNumeric implements ValidationStrategy {
    @Override
    public boolean execute(String s) {
        return s.matches("\\d+");
    }
}
Validator를 생성할 때 ValidationStrategy를 주입하도록 되어있어서 호출하는 쪽에서 적절한 전략을 선택할 수 있다.
public class Validator {
    private final ValidationStrategy strategy;

    public Validator(ValidationStrategy strategy) {
        this.strategy = strategy;
    }

    public boolean validate(String s) {
        return strategy.execute(s);
    }
}
1, 2번처럼 구현체를 생성해서 넣을 수도 있지만, ValidationStrategy가 함수형 인터페이스이기 때문에 3, 4번 처럼 간편하게 람다 표현식으로 전달할 수 있다.
@Test
public void testValidation() {
    // 1
    Validator numericValidator = new Validator(new IsNumeric());
    boolean b1 = numericValidator.validate("aaaa");
    assertFalse(b1);

    // 2
    Validator lowerCaseValidator = new Validator(new IsAllLowerCase());
    boolean b2 = lowerCaseValidator.validate("bbbb");
    assertTrue(b2);

    // 람다로 바꾸기
    // 3
    Validator numbericValidator2 = new Validator(s -> s.matches("\\d+"));
    boolean b3 = numbericValidator2.validate("aaaa");
    assertFalse(b3);

    // 4
    Validator lowerCaseValidator2 = new Validator(s -> s.matches("[a-z]+"));
    boolean b4 = lowerCaseValidator2.validate("aaaa");
    assertTrue(b4);
}
템플릿 메서드
어떠한 알고리즘을 사용하고 싶은데 조금만 고쳐서 사용하고 싶을 때는 템플릿 메서드 패턴을 사용한다.
public abstract class OnlineBanking {
    public void processCustomer(int id) {
        Customer c = Database.getCustomerWithId(id);
        makeCustomerHappy(c);
    }

    abstract void makeCustomerHappy(Customer c);
}
위의 코드를 보면 processCustomer라는 함수가 정의되어 Customer를 가져오는 로직이 정해져있고, makeCustomerHappy라는 메소드는 상속을 받는 클래스에서 구현하도록 되어있다.
public class OnlineBankingLambda {
    public void processCustomer(int id, Consumer<Customer> makeCustomerHappy) {
        Customer c = Database.getCustomerWithId(id);
        makeCustomerHappy.accept(c);
    }
}

new OnlineBaningLambda().processCustomer(1337, (Customer c) -> {
    System.out.println("Hello " + c.getName());
});
만약 위와 같이 Consumer를 활용하게 된다면 OnlineBanking을 상속받은 클래스를 만들지 않더라도 클라이언트에서 다양한 동작을 추가할 수 있다.
옵저버 패턴
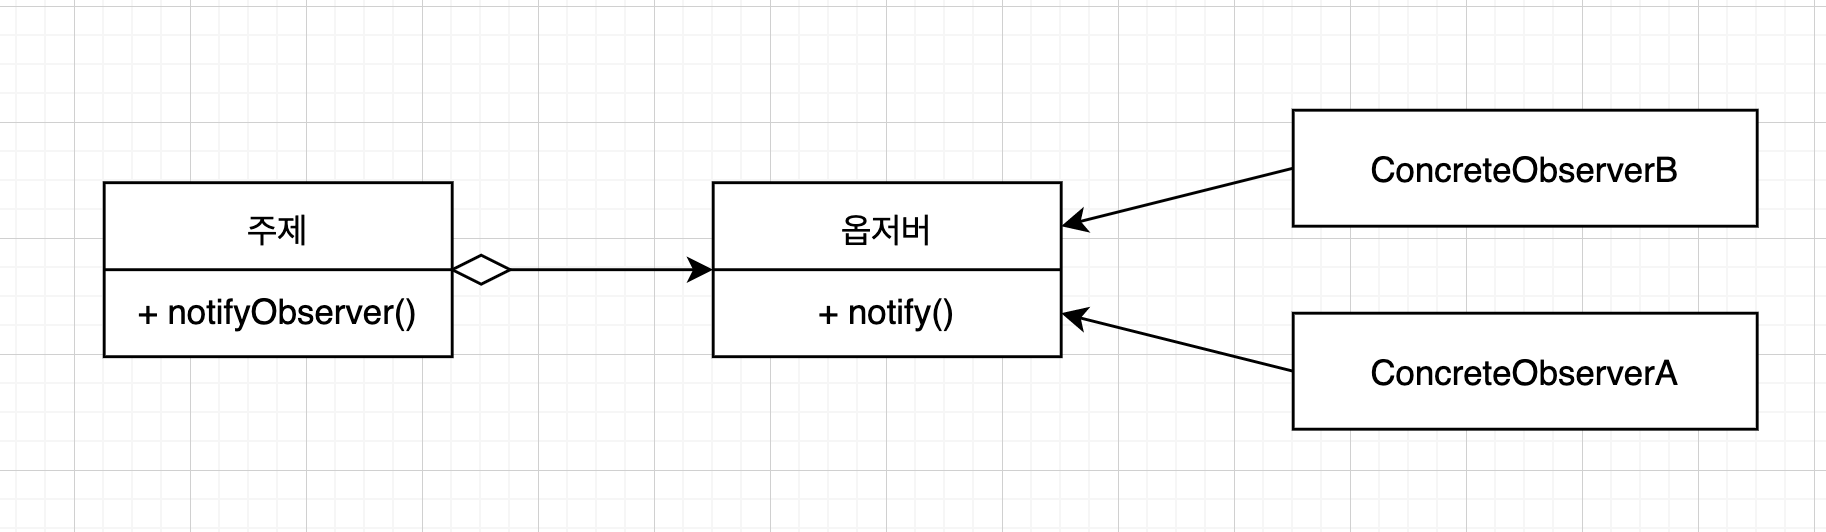
한 객체가 다른 객체 리스트에 자동으로 알림을 보내는 상황에서 쓰이는 패턴이다. 예제에서는 트위터가 멘션을 했을 때, 팔로워에게 트윗을 전하고 팔로워가 트윗을 받아서 각각의 다른 수행을 할 수 있는 로직을 구현한다.
public interface Observer {
    void notify(String tweet);
}


public class NYTimes implements Observer {
    @Override
    public void notify(String tweet) {
        if (tweet != null && tweet.contains("money")) {
            System.out.println("Breaking news in NY! " + tweet);
        }
    }
}

public class Guardian implements Observer {
    @Override
    public void notify(String tweet) {
        if (tweet != null && tweet.contains("queen")) {
            System.out.println("Breaking news from London... " + tweet);
        }
    }
}

public class LeMonde implements Observer {
    @Override
    public void notify(String tweet) {
        if (tweet != null && tweet.contains("wine")) {
            System.out.println("Today cheese, wine and news! " + tweet);
        }
    }
}
주제도 구현해주고, 옵저버 리스트를 만들어주어야 한다.
public interface Subject {
    void registerObserver(Observer o);
    void notifyObserver(String tweet);
}


public class Feed implements Subject {

    private final List<Observer> observers = new ArrayList<>();

    @Override
    public void registerObserver(Observer o) {
        this.observers.add(o);
    }

    @Override
    public void notifyObserver(String tweet) {
        observers.forEach(o -> o.notify(tweet));
    }
}


public class TweeterApplication {
    public static void main(String[] args) {
        Feed feed = new Feed();
        feed.registerObserver(new NYTimes());
        feed.registerObserver(new Guardian());
        feed.registerObserver(new LeMonde());
        feed.notifyObserver("The queen said her favourite book is Modern Java in Action!");
    }
}
이렇게 하면 queen을 observing하는 Guardian지에서 트윗을 받게 된다.
람다 표현식을 쓰면 위와 불필요한 코드를 제거할 수 있다.
feed.registerObserver(tweet -> {
    if (tweet != null && tweet.contains("book")) {
        System.out.println("something about book! " + tweet);
    }
});

feed.registerObserver(tweet -> {
    if (tweet != null && tweet.contains("Java")) {
        System.out.println("something about java! " + tweet);
    }
});
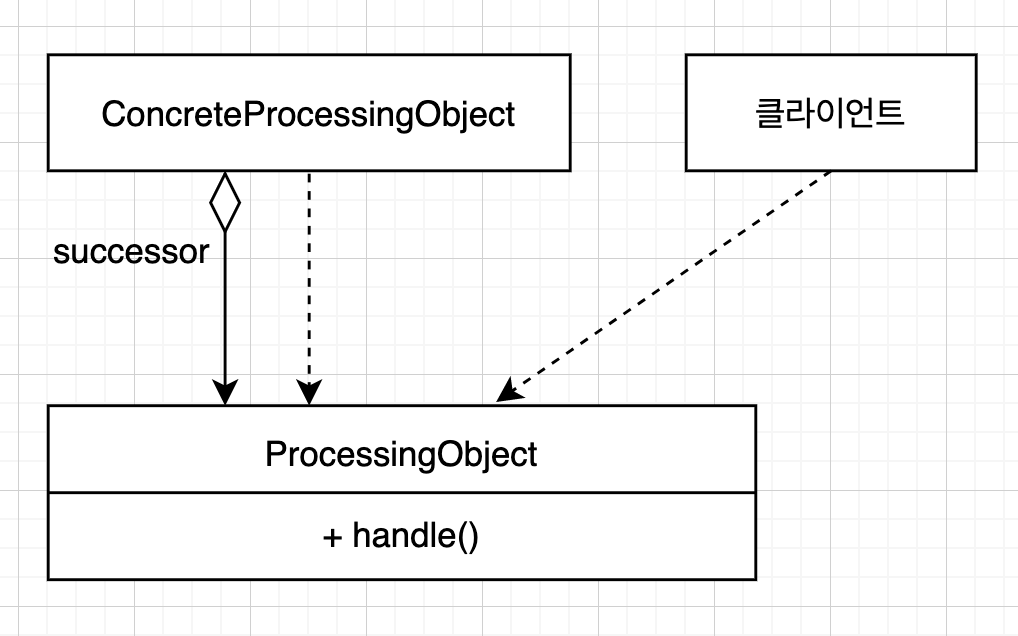
의무 체인
작업 처리 객체의 체인(동작 체인 등)을 만들 때는 의무 체인 패턴을 사용한다. 실무에서는 Validation을 해야하는 로직이 있을 때 작은 도메인 단위로 Rule들을 만들어서 RuleChain에 새로운 도메인 로직을 추가하거나 하곤 했다.
public abstract class ProcessingObject<T> {

    protected ProcessingObject<T> successor; // 계승자들의 Chain

    public void setSuccessor(ProcessingObject<T> successor) {
        this.successor = successor;
    }

    public T handle(T input) {
        T r = handleWork(input);
        if (successor != null) {
            return successor.handle(r);
        }
        return r;
    }

    abstract protected T handleWork(T input);

}
구현체에서 handleWork에 대한 알고리즘이 구현되도록 위임시켰고, successor를 연속적으로 설정할 수 있어서 LinkedList처럼 체인 형태로 자료구조가 만들어진다. handle을 호출하게 되면 연속적으로 자신의 것부터 시작해서 successor들의 handleWork를 호출하고 돌아오게 된다.
public class HeaderTextProcessing extends ProcessingObject<String>{
    @Override
    protected String handleWork(String input) {
        return "From Raoul, Mario and Alan: " + input;
    }
}

public class SpellCheckerProcessing extends ProcessingObject<String> {
    @Override
    protected String handleWork(String input) {
        return input.replaceAll("labda", "lambda");
    }
}
각각의 관심사에 따라서 Process할 내용들을 구현한 후, 아래와 같이 체인 구조를 만들어서 앞에 있는 객체의 handle()을 호출하면 연속적으로 각각의 handleWork()이 호출된다.
public static void main(String[] args) {
    ProcessingObject<String> p1 = new HeaderTextProcessing();
    ProcessingObject<String> p2 = new SpellCheckerProcessing();
    p1.setSuccessor(p2);

    String input = "Aren't labdas really sexy!?";
    String result = p1.handle(input);
    System.out.println(result);
    // prints "From Raoul, Mario and Alan: Aren't lambdas really sexy!?"
}
람다 표현식으로 리팩토링하면 다음과 같다.
public static void main(String[] args) {
    String input = "Aren't labdas really sexy!?";

    UnaryOperator<String> headerProcessing = (String text) -> "From Raoul, Mario and Alan: " + text;
    UnaryOperator<String> spellCheckProcessing = (String text) -> text.replaceAll("labda", "lambda");
    Function<String, String> pipeline = headerProcessing.andThen(spellCheckProcessing);
    String result2 = pipeline.apply(input);
    System.out.println(result2);

}
팩토리 패턴
팩토리는 객체 생성과 관련된 디자인 패턴으로서, 인스턴스화 로직을 외부에 노출하지 않는 방법이다. 아래처럼 name을 주입시키면 클라이언트는 내부 로직이 어떻게 되어있는지 신경쓰지 않고 객체를 받을 수 있다.
public class ProductFactory {

    public static Product createProduct(String name) {
        switch (name) {
            case "loan": return new Loan();
            case "stock": return new Stock();
            case "bond": return new Bond();
            default: throw new RuntimeException("No such product " + name);
        }
    }

}
이를 람다 표현식으로 리팩토링하면 아래와 같은데, 굳이..라는 느낌이 없지 않다.
public class ProductFactory {

    final static Map<String, Supplier<Product>> map = new HashMap<>();
    static {
        map.put("loan", Loan::new);
        map.put("stock", Stock::new);
        map.put("bond", Bond::new);
    }

    public static Product createProductByName(String name) {
        Supplier<Product> p = map.get(name);
        if (p != null) return p.get();
        throw new RuntimeException("No such product " + name);
    }

}
람다 테스팅
람다 자체는 익명이므로 테스트 코드에서 람다를 호출할 수 없다. 그저 다른 람다를 만들어서 검증을 해본다거나, 람다가 적용된 메소드를 호출해서 해당 로직을 검증하는 것이다. 책에서 여러가지 예제로 설명을 하지만 딱히 와닿지는 않고, 결국에는 람다를 사용하는 메소드의 의도와 동작을 테스트하는 것이 관건이다.
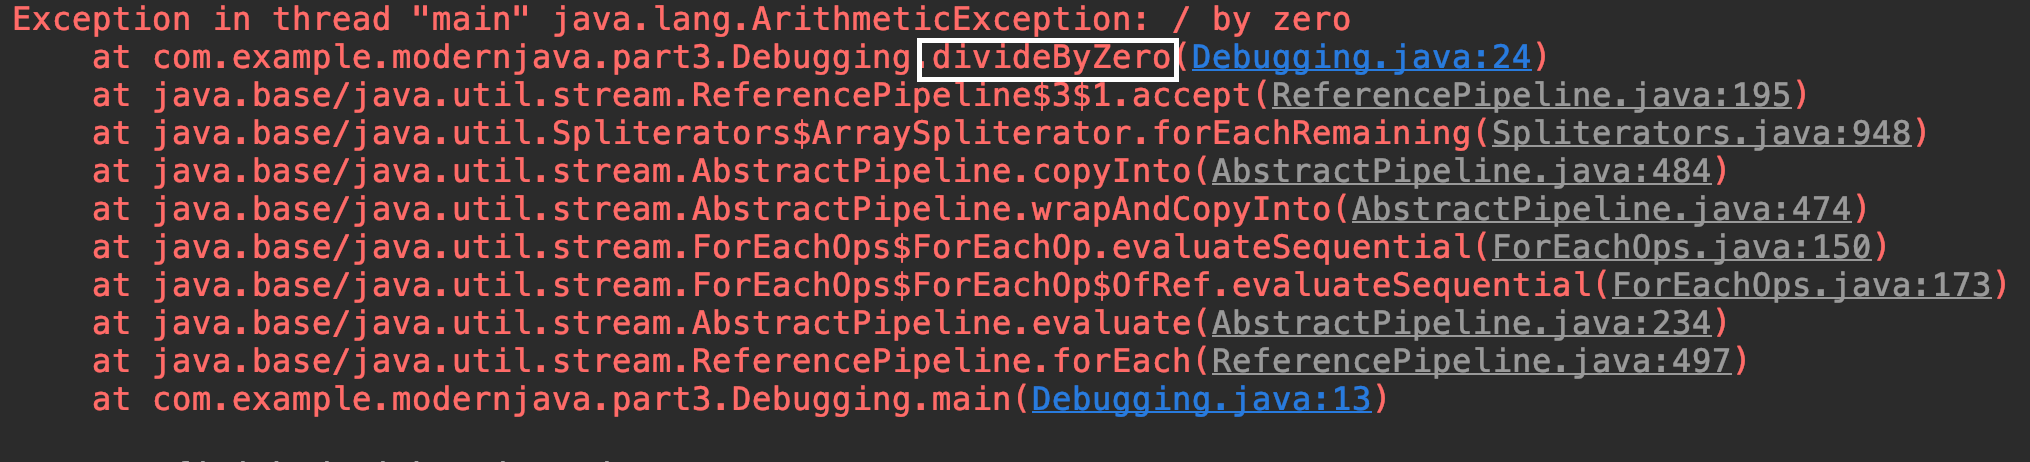
디버깅
스택 트레이스 확인
람다는 이름이 없기 때문에 조금 복잡한 스택 트레이스가 생성된다. 가령 다음과 같이 고의적으로 에러를 내는 코드가 있다면
public class Debugging {
    public static void main(String[] args) {
        List<Point> points = Arrays.asList(new Point(12, 2), null);
        points.stream().map(point -> point.getX()).forEach(System.out::println);
    }
}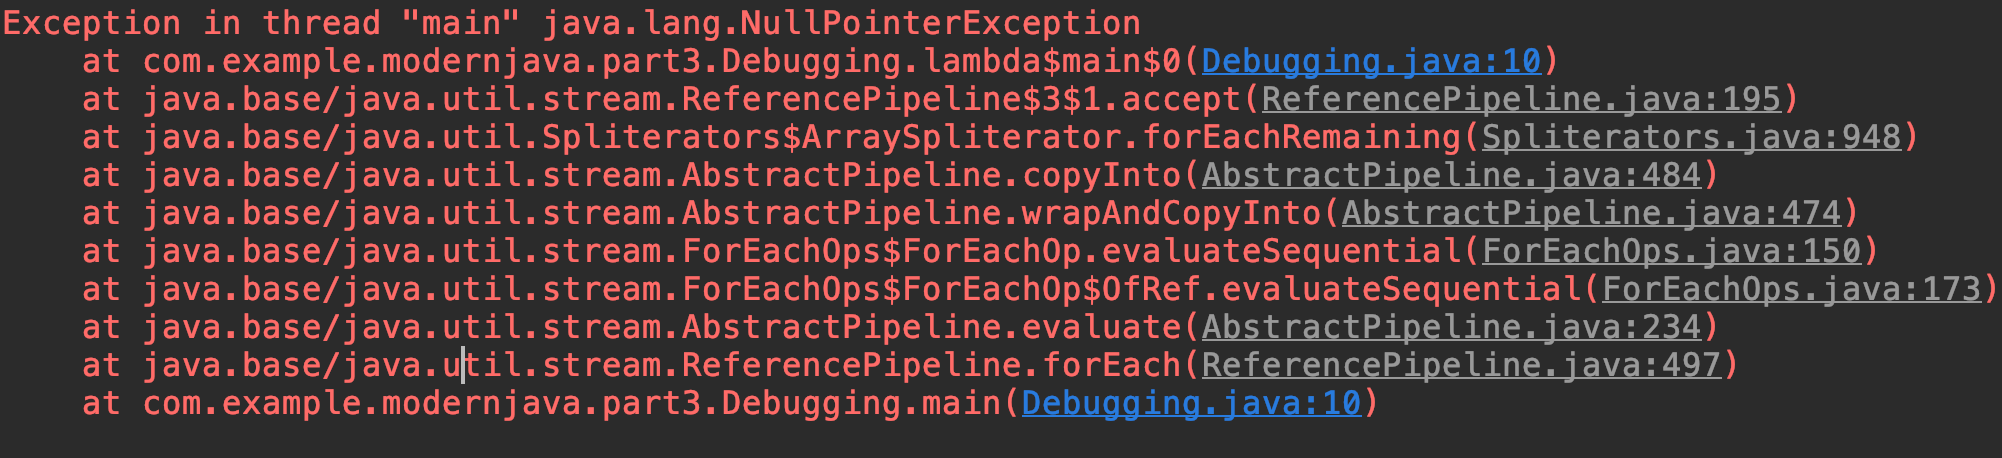
위와 같이 lambda$main$0 와 같은 것이 생긴다. $0이 느낌상 위에서부터 생긴 순서대로 $0, $1 이 람다의 이름으로 지정되는 것으로 보인다. 이게 여러개 있다면, 그리고 코드가 길다면 디버깅하기 매우 어려워질 것이다.
만약 point -> point.getX()를 Point::getX로 바꾸면 문제는 더 심각해진다.

메소드 참조를 사용하는 클래스와 곳에 선언되어 있다면 메소드 이름이 나오긴 한다.
로깅
스트림에서 디버깅을 할 때 forEach로 결과를 출력하거나 peek로 각각의 pipeline별로 확인을 할 수 있다.
public static void main(String[] args) {
    List<Integer> numbers = Arrays.asList(2, 3, 4, 5);

    numbers.stream()
            .map(x -> x + 17)
            .filter(x -> x % 2 == 0)
            .limit(3)
            .forEach(System.out::println);

    numbers.stream()
            .peek(x -> System.out.println("from stream: " + x))
            .map(x -> x + 17)
            .peek(x -> System.out.println("after map: " + x))
            .filter(x -> x % 2 == 0)
            .peek(x -> System.out.println("after filter: " + x))
            .limit(3)
            .peek(x -> System.out.println("after limit: " + x))
            .collect(Collectors.toList());
}'Dev Log > Java' 카테고리의 다른 글
| Modern Java In Action 정리 - 12 새로운 날짜와 시간 API (0) | 2020.07.04 |
|---|---|
| Modern Java In Action 정리 - 11 null 대신 Optional 클래스 (0) | 2020.06.27 |
| Modern Java In Action 정리 - 10장 람다를 이용한 도메인 전용 언어 (0) | 2020.06.22 |
| Modern Java In Action 정리 - 8장 컬렉션 API 개선 (0) | 2020.06.06 |
| [Java] Interface vs Abstract class (0) | 2019.05.07 |

